Learn Git / Using Git
This lesson explains how to use Git commands for a basic version control workflow. Concepts and information from previous lessons are put into practice. The lesson is somewhat verbose in order to explain each activity and Git command. Future lessons omit the verbose background information. It is expected that repeated use of Git commands will become second nature and the information can be used as a reference, or search the internet for specific answers.
Estimated completion time: 45-90 minutes
Note that git commands can be run from any folder in a repository's working files and otherwise will generate an error
similar to the following (also note that the Git Bash prompt does not display a repository name):
$ sam git-repos $ git status
fatal: Not a git repository (or any of the parent directories): .git
Git Bash is used for examples because of its utility. The local computer user "sam" is used for examples, which in this case is a different name than the GitHub "smalers" user but is the same person.
The following sections are included in this lesson:
- Create Repository and Clone Using
git clone- creates a local copy of repository (at start) - Create an Issue on GitHub Using GitHub Website - issues define increments of work
- Pull Current Version from GitHub using
git pull- update local files for work done by others - Create and Checkout a Branch Using
git branchandgit checkout- isolate local work until ready to merge - Add and Edit Files Using Text Editor - make changes to files
- Check Repository Status Using
git status- useful feedback on editing and repository status - Add Files to Staging Area Using
git add- indicate files to commit - Commit Files to Repository Using
git commit- commit the files to the repository - View the Repository History Using
git log- useful to understand commit history - Validate Changes Using Automated Tests - test before merging and sharing with others
- Merge Branch Using
git merge- merge changes into the master branch files - Push Files to GitHub Using
git push- share with others via GitHub - Delete the Branch Using
git branch- branch is no longer needed - Create a Tag Using
git tag- mark a version as important (as needed) - Publish User Versions - publish versions of products for users
- Next Steps - use the above to work on a project
See also the Pro Git Book.
Create Repository and Clone Using git clone
This step will be performed once to initialize the local copy of the repository whereas the remaining steps are performed in sequence every time a new issue needs to be worked on. The step can be repeated to restart a local repository for an automated build process or to reinitialize the local copy if the remote GitHub repository has undergone major changes and it is easier to start with a new copy.
See the previous lesson for example of how to create a repository and clone to a local computer: New Repository.
At any point the git status command can be used to display the status of the repository.
For example, the following output illustrates the status for a new repository using Git Bash:
sam git-repos $ cd test-cdss-git-training-repo/

sam (master) test-cdss-git-training-repo $ ls
LICENSE  README.md

sam (master) test-cdss-git-training-repo $ git status
On branch master
Your branch is up-to-date with 'origin/master'.
nothing to commit, working tree clean
Note that when using Git Bash the command shell prompt provides useful information, which for the above example includes
the current user (in this case sam), currently checked out branch (master),
and the current folder (test-cdss-git-training-repo).
The prompt will also show symbols to indicate the status of the repository (* meaning files have changed and + meaning
files have been added but not committed, as illustrated below).
When a repository is cloned, working files from a branch are automatically checked out and can be seen in the repository folder. The concept of working file is discussed more below.
Create an Issue on GitHub Using GitHub Website
This step can be performed by anyone that needs to report an issue.
Files in a repository can be changed without extensive planning. For example, a developer that has good understanding of software code can just decide to fix a bug or implement an enhancement without telling anyone. This may work well for a single-person team or a personal repository. However, for multi-person teams and public repositories, it is helpful to connect the work done in a repository to an issue that is identified and described. Such issues can be prioritized, attached to specific people, and be paid for with funding from consulting projects.
The GitHub Issues tab for a repository provides a way to report bugs and request enhancements. For example, use the New issue button to create a new issue, as shown in the following image. The issue data on the right can be used to provide details that correspond to a branch name, such as whether an issue is a bug or an enhancement (feature). Comments can also be added to the issue, for example to indicate progress and coordinate between developers.
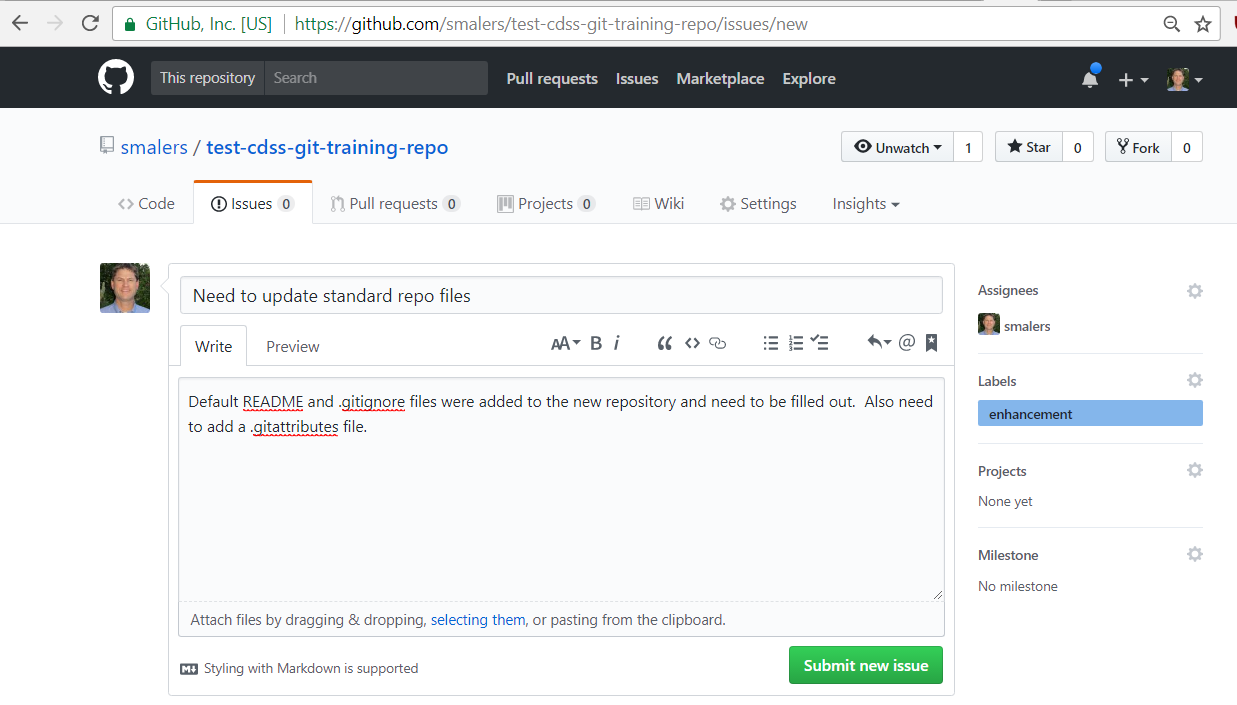
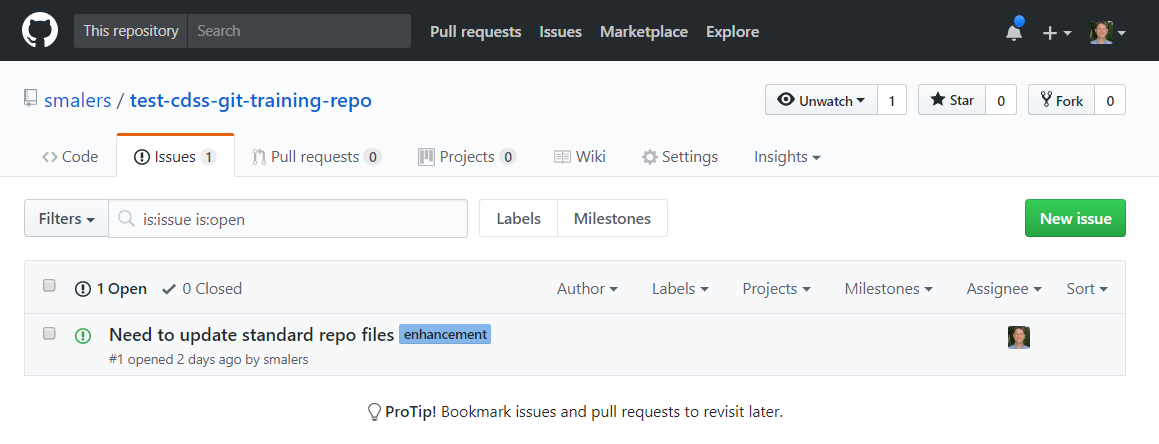
For this training, go ahead and create an issue similar to the following because it will be used in below. Note that when the issue is submitted it will be given an issue number, in this case 1, as shown below:
Pull Current Version from GitHub Using git pull
This step ensures that new work on the local files start with a copy that matches the remote version. Consequently, new work will build on that done by others.
The default branch in the repository is named master and contains the current approved files that have previously been committed.
Only tested and validated changes should be committed to the master.
More information about repository workflow concepts is presented in later lessons.
During normal development on a team, changes will be committed to the master branch over time.
Before embarking on new changes, a first step is typically to synchronize the local master branch with the remote (GitHub)
master branch to ensure that work on a new issue is starting from the current published files.
This can be done with the git pull command, as follows:
sam (master) test-cdss-git-training-repo $ git pull
Already up-to-date.
The above indicates that the local files are already consistent with the remote files.
More advanced operations may be needed. For example, git pull actually is equivalent to git fetch and git merge,
where the remote origin/master branch is being process with the local master branch.
It may be appropriate to do these steps individually to allow for review and testing.
Other training lessons explain how to pull a remote branch.
There may also be a conflict if the work done by others and committed to the master branch overlaps files
that you have edited. Later lessons focus on merge conflicts.
However, for simple workflows with a small number of repository maintainers,
assume that remote changes are OK and can be pulled into the master branch without issue.
Create and Checkout a Branch Using git branch and git checkout
This step creates a separate copy of files in a branch to temporarily isolate new work. This allows the work to be fully tested before merging. The work also can be thrown away if it becomes clear that it is not worth finishing.
New work should be done in a branch, for a number of reasons:
- Using a branch ensures that a change to the project is encapsulated and has clear bounds. This is helpful when reviewing change history and if the change needs to be rolled back.
- The branch can be discarded if it is decided that the work is not useful.
- If necessary, the work being done on a branch can be set aside until later, for example if a more urgent change needs to be done on a hot fix branch.
A branch should be named according to a convention.
Although there is some precedent for using slashes, this will actually cause problems in some situations.
Therefore it is recommended that branch names use dashes (not slashes or spaces) and follow the pattern issuenum-type-topic, where
issuenumis the issue number from the GitHub Issues tab for the repository.typeis a category such asbug(for bug fix),feature(for enhancement),test(for a test), etc. The GitHub Issues page provides a list of "labels" that can be used as an issue type.topicis a short phrase describing the issue, using dashes instead of spaces
The above example illustrated how to create an issue on the GitHub website. Therefore, to work on the issue, create a new branch and check it out into the working files:
sam (master) test-cdss-git-training-repo $ git branch 1-feature-init-repo

sam (master) test-cdss-git-training-repo $ git checkout 1-feature-init-repo
Switched to branch '1-feature-init-repo'

sam (1-feature-init-repo) test-cdss-git-training-repo $ git status
On branch 1-feature-init-repo
nothing to commit, working tree clean

sam (1-feature-init-repo) test-cdss-git-training-repo $ git branch
* 1-feature-init-repo
  master
The above illustrates several commands.
The git branch command creates a new branch 1-feature-init-repo but does not change to that branch.
A branch in the repository is a divergence from the current branch, in this case from the master branch.
The previously committed files in the master branch are the starting point for the new branch,
as well as any new or modified files in the working files.
It is possible to create multiple parallel branches, such as master, a dev branch for development, and issue/feature branches.
However, to keep things simple, OpenCDSS is initially using a master branch and issue/feature branches.
The git checkout command changes the current working files to the new branch (1-feature-init-repo).
Only one set of working files is used at a time and the git checkout command is used to switch the working files
between branches.
If by chance any files had been changed in working files but had not been committed to the master, they
would remain so that there is an opportunity to commit them to the new branch.
Git commands and protocols are available to help deal with retaining intermediate work (such as git stash),
but are not discussed here.
Note that the command prompt for Git Bash changes to indicate that the current branch is now 1-feature-init-repo.
Note also that the Git Bash window supports tab-completion. For example, type git checkout 1 and then
press the tab key and the git command will fill in the rest of the branch name.
This can help be more efficient at using Git on the command line.
Add and Edit Files Using Text Editor
This step adds, deletes, renames, and modifies files - this is the same work that would be done if version control were not used.
The example new (mostly empty) repository that was initialized on the GitHub website has files similar to the following:
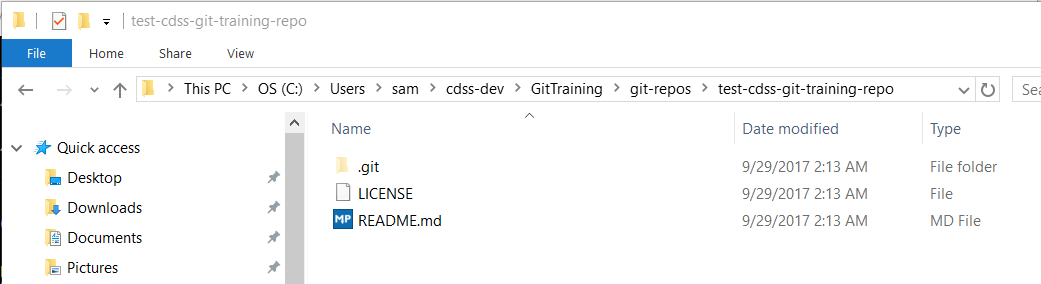
Use a text editor to edit the README.md file so that it has contents similar to the following:
# test-cdss-git-training-repo #

This is a test repository used with the CDSS Git training.

## Contents ##

The repository contains a few folders and files created to demonstrate Git use.

## Maintainer ##

The repository is maintained by Steve Malers.

## Contributing ##

Although this is a public repository, it is just used for training so no contributions are expected.
If contributions were accepted, they would use the Issues or pull requests.

## License ##

[GPL 3.0](https://github.com/smalers/test-cdss-git-training-repo/blob/master/LICENSE)
Use a text editor to edit the .gitignore file so that it has contents similar to the following.
The list of files to be ignored can be expanded later if necessary.
# Files that should be automatically ignored (not saved) in the repository

# Ignore temporary files from editors

*.swp
*.swo

# Office temporary files

*.tmp

# Word
#~$*.doc*
# Excel
#~$*.xls*
# PowerPoint
#~$*.ppt*
~$*
Use a text editor to edit the .gitattributes file so that it has contents similar to the following.
The list of binary and text files can be expanded as needed.
# Settings for the repository

# Cause line endings in the repository to be linefeed (LF) and local files to be that of the operating system.

* text=auto

# Indicate binary files

*.png binary
*.jpg binary
Create an empty folder named empty-folder.
Create a folder named folder and create one or more text files in that folder.
Note that at this point the working files have been changed but no files have been added to the repository. The new/modified files are just files on the file system.
Note also that the prompt for the Git Bash shell shows an asterisk, indicating the files have been changed:
sam (1-feature-init-repo +) test-cdss-git-training-repo $
Check Repository Status Using git status
git status is your friend. Use it often to get the lay of the land and understand status of the local files.
A common task is to check the status of the repository and working files.
The git status command can be run in any folder in the repository working files
and will display the status of files, using relative paths from the current location.
sam (1-feature-init-repo *) test-cdss-git-training-repo $ git status
On branch 1-feature-init-repo
Changes not staged for commit:
  (use "git add <file>..." to update what will be committed)
  (use "git checkout -- <file>..." to discard changes in working directory)

        modified:   README.md

Untracked files:
  (use "git add <file>..." to include in what will be committed)

        .gitattributes
        .gitignore
        folder/

no changes added to commit (use "git add" and/or "git commit -a")
The above output indicates which files have been modified, and which are new (untracked).
If any files had been deleted, they would also be listed.
The git status command is also helpful to list files that should be ignored but have not yet been added to the .gitignore file.
Ignored files will not be listed by git status so if such files are listed, they need to be added to the .gitignore file.
It is wise to check the status between actions.
It is also wise to work on changes incrementally and commit incremental progress so that the list of files
that are modified for an issue is not overwhelming (committing is discussed below).
Note that Git will not add an empty folder to the repository because the Git design is based on tracking file contents.
Therefore, in order to keep an otherwise empty folder in a repository, something must be added to the folder.
Why would we want an empty folder? One reason is as a location where dynamic content is created.
Rather than requiring other developers to create such folders so that processes work,
the folder is created ahead of time and is kept empty.
Another reason is that we have designed a folder structure for a project but have not yet added files
in all of the folders.
One solution to adding an empty folder to the repository is to add a README.md file with some simple
text - the file can be left as an explanation or can
be removed when it is no longer needed. Or, add a .gitignore file with the following content:
# Ignore files in this folder, except for this .gitignore file itself
*
!.gitignore
For this lesson, create a README.md file in the empty-folder folder.
Running git status again will show the empty-folder (which is not actually totally empty):
sam (1-feature-init-repo *) test-cdss-git-training-repo $ git status
On branch 1-feature-init-repo
Changes not staged for commit:
  (use "git add <file>..." to update what will be committed)
  (use "git checkout -- <file>..." to discard changes in working directory)

        modified:   README.md

Untracked files:
  (use "git add <file>..." to include in what will be committed)

        .gitattributes
        .gitignore
        empty-folder/
        folder/

no changes added to commit (use "git add" and/or "git commit -a")
Note that git status does not list the files in new folders (it only lists the new folder).
The files will be shown after the git add command is used, as discussed in the next section.
Add Files to Staging Area Using git add
Modified working files (the files that are in normal folders) are not ready to commit as changes. Files need to be selected into the "index" ("staging area") before that subset of files is committed. Accidentally doing this can be backed out.
The previous file modifications resulted in changes to the working files. However, these files do not automatically get added to the Git repository. Git requires that files must be specifically indicated for commits, which allows incremental work to be purposefully committed to the repository. An analogy is moving files to a virtual folder before writing them to a DVD (the DVD burning software manages the list of files to write to the DVD).
Git uses an intermediate area called the "index" or "staging area" for files that
exist in the working files and will also be committed to the repository.
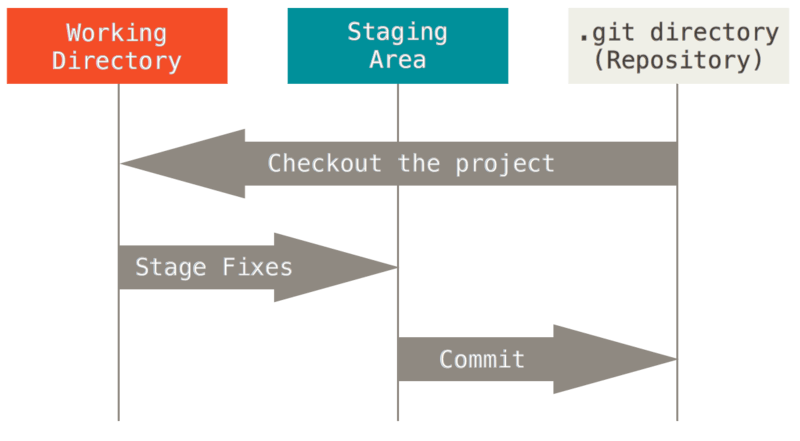
The following image illustrates the different Git file areas (see original in
"Getting Started - Git Basics").
There are actually 3 locations on the local computer where files can exist
(although it is generally not worth trying to figure out the internals of the staging area and .git folder).
Use the git add command to add (stage) files for the commit step, in this case using the example files in this lesson.
The following assume that the current folder is the root folder in the working files (the repository folder).
The following git add command adds a single file and git status shows that it has now
been staged because the README.md file is listed under Changes to be committed.
The .gitignore and .gitattributes files are assumed to have been added as per the
Standard Repository Files documentation.
sam (1-feature-init-repo *) test-cdss-git-training-repo $ git add README.md
sam (1-feature-init-repo +) test-cdss-git-training-repo $ git status
On branch 1-feature-init-repo
Changes to be committed:
  (use "git reset HEAD <file>..." to unstage)

        modified:   README.md

Untracked files:
  (use "git add <file>..." to include in what will be committed)

        .gitattributes
        .gitignore
        empty-folder/
        folder/
Note that the Git Bash prompt now shows a +, indicating that files have been added to the staging area.
The following git add command adds multiple files using a * wildcard,
in this case adding the two new folders:
sam (1-feature-init-repo +) test-cdss-git-training-repo $ git add *folder
warning: LF will be replaced by CRLF in empty-folder/README.md.
The file will have its original line endings in your working directory.
warning: LF will be replaced by CRLF in folder/afile.txt.
The file will have its original line endings in your working directory.

sam (1-feature-init-repo +) test-cdss-git-training-repo $ git status
On branch 1-feature-init-repo
Changes to be committed:
  (use "git reset HEAD <file>..." to unstage)

        modified:   README.md
        new file:   empty-folder/README.md
        new file:   folder/afile.txt

Untracked files:
  (use "git add <file>..." to include in what will be committed)

        .gitattributes
        .gitignore
Note that the Changes to be committed section does not say anything about the new folders
but instead says new file: for each new file in the new folders.
The messages about LF will be replaced by CRLF is due to using the vim editor within Git Bash,
which created the files using Linux-style line endings (LF).
Git for Windows will actually check out files using Windows-style CRLF line endings, hence the warning.
The .gitattributes settings will ensure that files in the repository use LF in any case.
Such messages will likely not be shown if a Windows editor is used to edit files.
In summary, these warnings can generally be ignored and will generally be omitted from this training documentation.
Finally, git add -A is useful for adding all files that have been modified.
This is particularly useful because in addition to adding files that are new or have been modified,
the git rm command can be used to delete files from the repository,
and must be used if the file was removed from the file system.
The git add -A command can be used instead of specific git add and git rm commands.
sam (1-feature-init-repo +) test-cdss-git-training-repo $ git add -A
sam (1-feature-init-repo +) test-cdss-git-training-repo $ git status
On branch 1-feature-init-repo
Changes to be committed:
  (use "git reset HEAD <file>..." to unstage)

        new file:   .gitattributes
        new file:   .gitignore
        modified:   README.md
        new file:   empty-folder/README.md
        new file:   folder/afile.txt
The above shows that all files are now ready to be committed.
If git add -A adds too many files (such as files that need to be in .gitignore),
remove the files from the staging area using git reset HEAD -- path/to/file,
as per the Stack Overflow article.
Commit Files to Repository Using git commit
This step commits the staged files to the repository branch, at which time those changes will be part of the repository history.
At this point files have been modified in the working files and have been staged for commit.
The git commit command is used to commit the changes to the repository on the currently checked-out branch.
The command is generally run either by specifying the commit message on the command line,
or by specifying the commit message in an editor (git config --list will display the core.editor property).
Commit using Command Line Commit Message
Commit using a command line message if the commit message is short and fits on one line.
The example below illustrates how the -m message command line parameter specifies the commit message.
sam (1-feature-init-repo +) test-cdss-git-training-repo $ git commit -m 'Create standard repository files'
[1-feature-init-repo 50dadc6] Create standard repository files
 5 files changed, 50 insertions(+), 2 deletions(-)
 create mode 100644 .gitattributes
 The following illustrates how to commit files using a command-line commit message:
 create mode 100644 .gitignore
 rewrite README.md (100%)
 create mode 100644 empty-folder/README.md
 create mode 100644 folder/afile.txt

 sam (1-feature-init-repo) test-cdss-git-training-repo $ git status
 On branch 1-feature-init-repo
 nothing to commit, working tree clean
Note that the output from the git commit command provides feedback on whether a new file was created in the repository (create)
or was updated (rewrite).
The mode numbers indicate the type of file - Git will try to retain information about whether a file is a normal file
(mode=100644), executable (mode=100755), etc., so that when someone else clones the repository or checks out a branch
the file mode will match the original.
Note that the git status output shows that the working files and repository branch are in agreement and the
Git Bash prompt is normal again (no * or + shown).
Commit using Text Editor Commit Message
Commit using a text editor message if the commit message is longer, including multiple lines. Helpful information is also provided by Git.
The other typical way to commit changes is to interactively edit the commit message.
This is preferred in many cases because a best practice is to enter a summary message on the first line,
then a blank line, then more details, in particular when doing a merge commit (discussed below).
To simulate this approach and confirm that an editor is assigned, edit and commit the README.md file as shown below.
First edit the README.md file using the text editor of choice. Then run the commands shown below:
sam (1-feature-init-repo *) test-cdss-git-training-repo $ git add README.md
sam (1-feature-init-repo +) test-cdss-git-training-repo $ git commit
The git commit command will start an editor in a temporary file and will
automatically generate a useful default message and instructions.
The #-comments will not be part of the saved commit message.
Edit the commit message with comments similar to the following and save the file.
Updated README.md file to include more information about the repository.

This is an example of a multi-line commit message.
# Please enter the commit message for your changes. Lines starting
# with '#' will be ignored, and an empty message aborts the commit.
# On branch 1-feature-init-repo
# Changes to be committed:
#       modified:   README.md
#
The first line will be displayed by Git commands that summarizes change history and the full commit message is displayed where more verbose history is requested. Save the file and the following will be displayed:
[1-feature-init-repo fabfed9] Updated README.md file to include more information about the repository.
 1 file changed, 1 insertion(+), 1 deletion(-)
 sam (1-feature-init-repo) test-cdss-git-training-repo $ git status
 On branch 1-feature-init-repo
 nothing to commit, working tree clean
View the Repository History Using git log
View the repository history log to understand the sequence of commits that have been made, including those made by other developers and branch merges.
At this point, if following the training instructions, there should be 3 commits in the repository for the branch:
the original commit from GitHub, and two commits for files that have been added and modified.
The git log command shows the history of commands:
sam (1-feature-init-repo) test-cdss-git-training-repo $ git log
commit fabfed9377ec2b3d271e8829c5abd18ae5928105
Author: Steve Malers <steve.malers@openwaterfoundation.org>
Date:   Sun Oct 1 11:21:11 2017 -0600

    Updated README.md file to include more information about the repository.

    This is an example of a multi-line commit message.

commit 50dadc6c618aee13495f0fd2acd5ee58d544cdf7
Author: Steve Malers <steve.malers@openwaterfoundation.org>
Date:   Sun Oct 1 11:05:33 2017 -0600

    Create standard repository files

commit a0302cda79d7f085c790514f4212f5c9ee5a2b0e
Author: Steve Malers <steve.malers@openwaterfoundation.org>
Date:   Fri Sep 29 01:18:54 2017 -0600

     Initial commit
The commit messages show the SHA-1 hash strings that provide unique identifiers for a commit. These hashes are useful for tracking the history but the date/time and commit messages are often more useful for basic use and illustrate why it is important to provide useful commit messages. The following example shows how to visually graph the history (it will be more interesting as more changes are committed):
sam (1-feature-init-repo) test-cdss-git-training-repo $ git log --oneline --graph --decorate --all
* fabfed9 (HEAD -> 1-feature-init-repo) Updated README.md file to include more information about the repository.
* 50dadc6 Create standard repository files
* a0302cd (origin/master, origin/HEAD, master) Initial commit
It is also useful to know what GitHub issue is being worked on. This connection is discussed in the next section.
Finally, graphical interfaces such as Git GUI are available that can display the repository log (history). These tools are not discussed in this basic training.
Validate Changes Using Automated Tests
It is important to validate changes before sharing them with other developers or making public. Doing a good job with changes will save other people from finding errors.
At this point the local branch has been updated to include the new changes, and the repository is in agreement with the working files. The next steps are to merge the branch into the master branch as an official change and then push the local changes to the remote repository so that other people can synchronize those changes into their work.
However, we want to make sure that the work that has been done is correct because we don't want to share files that have errors. Therefore, we need to do final validation of the files before merging them. Actually, testing should have occurred on working files in previous steps before committing to the local branch, and final validation is just that... a final check.
Validation is not something that Git does. Instead, automated software testing or other checks would occur consistent with the development tools. More information about software testing is discussed in the development documentation for each software program.
If it is necessary to share the changes with a collaborator before merging, then it is possible to push the branch to GitHub before merging. Then the collaborator can pull the branch to their local computer and examine the files. Such collaboration may or may not be needed, depending on the size of the team and the need for peer review.
Merge Branch using git merge
The branch that was used to isolate new changes needs to be merged into the master files in order to enhance the product that is being worked on, for example to resolve the issue that initiated the changes.
Assuming that the files that have been committed to the local issue branch have passed tests,
they can be merged into the master branch using the git merge command.
A merge can involve small units of work such as a single commit,
or a merge may involve multiple commits that have been made to the local issue branch.
A large merge typically involves a more substantial change, such as a major new software feature.
Git software is fairly sophisticated in its ability to merge content from multiple files and detect conflicts.
Merge conflicts are discussed in a later lesson.
A merge conflict occurs when more than one developer has changed the same lines in a file and the
git merge command does not know how to automatically resolve the merge.
Alternatively, in many cases, coordination on a team will ensure that only one person is working in an area of
the code at the same time and merge conflicts can be avoided.
The initial git pull (or git fetch followed by git merge) serves to align the GitHub master branch
with the local master branch so that any increment of work is manageable and minimizes merge conflicts.
Git provides several features to control merges and the protocols of a specific project may define the approach. The protocol for OpenCDSS is to follow best practices but there are often multiple approaches. The following sections describe options for merging, although there is much more information online.
The preferred option for OpenCDSS is the git merge --no-ff option discussed below.
Other options may be considered in the future as developers become more skilled with Git.
Merge Using git merge - Default is to Fast Forward
This option is described first for illustration.
However, the git merge --no-ff option described in the next section is recommended.
By default, the git merge command will do a "fast forward" merge.
This means that all the changes on the local issue branch will be replayed onto the master branch and the commit history
will include every incremental commit that occurred.
The term "fast forward" is used because the head of the master branch (the most recent commit) is moved to the same commit as the
most recent commit on the issue branch.
The downside of this approach is that the history becomes a long sequence of (at times) minor commit messages.
And, by default, there is no indication of the branch merge.
Therefore, multiple branch merges just look like a lot of commits on the master.
One philosophy is that all commits should be present in the history and another philosophy is that the history should be compact.
Let's illustrate this merge approach with the training repository.
The previous steps have committed all changes to the issue branch and there should be two commits.
To merge the branch it is necessary to first checkout the master branch using git checkout master
and then merge the requested issue branch into the master using git merge 1-feature-init-repo,
as follows. An image is used to illustrate the colors output by Git Bash.
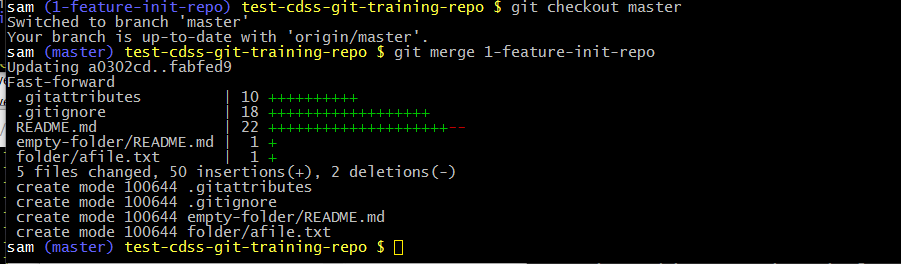
Note that git merge indicates in output that a Fast-forward merge is occurring.
The graph indicates the number of additions and deletions to each file.
The following git log output illustrates the history for the master branch, which now includes the commits
that were made to the issue branch.
Note that the SHA-1 hash strings for the commits match those in the issue branch.
sam (master) test-cdss-git-training-repo $ git log
commit fabfed9377ec2b3d271e8829c5abd18ae5928105
Author: Steve Malers <steve.malers@openwaterfoundation.org>
Date:   Sun Oct 1 11:21:11 2017 -0600

    Updated README.md file to include more information about the repository.

    This is an example of a multi-line commit message.

commit 50dadc6c618aee13495f0fd2acd5ee58d544cdf7
Author: Steve Malers <steve.malers@openwaterfoundation.org>
Date:   Sun Oct 1 11:05:33 2017 -0600

    Create standard repository files

commit a0302cda79d7f085c790514f4212f5c9ee5a2b0e
Author: Steve Malers <steve.malers@openwaterfoundation.org>
Date:   Fri Sep 29 01:18:54 2017 -0600

    Initial commit
The downside of the above output is that it is difficult to see when an issue branch was merged since only the specific commit messages are indicated. An alternative approach is discussed in the next section.
Merge Using git merge --no-ff - Do not Fast Forward
This is the preferred option to merge a branch.
In order to illustrate another approach, we must first create another branch to demonstrate.
Therefore, execute commands as follows to create a new 1b-feature-init-repo branch:
sam (master) test-cdss-git-training-repo $ git branch 1b-feature-init-repo
sam (master) test-cdss-git-training-repo $ git checkout 1b-feature-init-repo

... then edit the README.md file with a text editor...

sam (1b-feature-init-repo *) test-cdss-git-training-repo $ git add README.md

sam (1b-feature-init-repo +) test-cdss-git-training-repo $ git commit -m 'Minor change to illustrate merge lesson'
[1b-feature-init-repo c4a4eb5] Minor change to illustrate merge lesson
 1 file changed, 2 insertions(+), 1 deletion(-)

sam (1b-feature-init-repo) test-cdss-git-training-repo $ git checkout master
Switched to branch 'master'
Your branch is ahead of 'origin/master' by 2 commits.
   (use "git push" to publish your local commits)

sam (master) test-cdss-git-training-repo $ git merge --no-ff 1b-feature-init-repo
Merge made by the 'recursive' strategy.
 README.md | 3 ++-
 1 file changed, 2 insertions(+), 1 deletion(-)


sam (master) test-cdss-git-training-repo $ git log --oneline --graph --decorate --all
*   f76d8f5 (HEAD -> master) Merge branch '1b-feature-init-repo'
|\
| * c4a4eb5 (1b-feature-init-repo) Minor change to illustrate merge lesson
|/
* fabfed9 (1-feature-init-repo) Updated README.md file to include more information about the repository.
* 50dadc6 Create standard repository files
* a0302cd (origin/master, origin/HEAD) Initial commit
Note that the git merge --no-ff command prompted for a commit message (whereas git merge did not),
and git merge --no-ff will automatically insert a draft comment indicating the branch being merged.
The git log therefore contains all of the normal "fast forward" commits and additionally a commit for the merge,
which is helpful to understand when branches were merged.
The following is the git log output. Note the extra Merge branch commit in the git log output,
which provides a clear indication of when the branch was merged.
sam (master) test-cdss-git-training-repo $ git log
commit f76d8f5d24db3cd9353d7874d093f286c80dc4f0
Merge: fabfed9 c4a4eb5
Author: Steve Malers <steve.malers@openwaterfoundation.org>
Date:   Sun Oct 1 15:10:52 2017 -0600

    Merge branch '1b-feature-init-repo'

    Example of using git merge --no-ff

commit c4a4eb523f281d079fefa6caf41406fc4d33233d
Author: Steve Malers <steve.malers@openwaterfoundation.org>
Date:   Sun Oct 1 15:10:14 2017 -0600

    Minor change to illustrate merge lesson

commit fabfed9377ec2b3d271e8829c5abd18ae5928105
Author: Steve Malers <steve.malers@openwaterfoundation.org>
Date:   Sun Oct 1 11:21:11 2017 -0600

    Updated README.md file to include more information about the repository.

    This is an example of a multi-line commit message.

commit 50dadc6c618aee13495f0fd2acd5ee58d544cdf7
Author: Steve Malers <steve.malers@openwaterfoundation.org>
Date:   Sun Oct 1 11:05:33 2017 -0600

     Create standard repository files

commit a0302cda79d7f085c790514f4212f5c9ee5a2b0e
Author: Steve Malers <steve.malers@openwaterfoundation.org>
Date:   Fri Sep 29 01:18:54 2017 -0600

    Initial commit
Merge Using git rebase - Compress the History
This is a more advanced approach that may or may not be phased into CDSS projects.
Git rebasing basically replaces changes onto the receiving branch so that all the changes are combined. This approach is not recommended for OpenCDSS until developers become skilled at basic Git usage.
See the Git Pro Book chapter on Git Branching - Rebasing for more information.
Push Files to GitHub Using git push
This step is needed to share local work with other contributors and public users of the repository files. It is best to push files up frequently for small increments of work if possible so that developers' repositories march together and do not become significantly disconnected. Otherwise, it may take more work to synchronize changes.
At this point the original issue is hopefully resolved and has been sufficiently tested so that it can be publicly released.
Running git status again shows the following:
sam (master) test-cdss-git-training-repo $ git status
On branch master
Your branch is ahead of 'origin/master' by 4 commits.
  (use "git push" to publish your local commits)
  nothing to commit, working tree clean
The above indicates that the local repository is 4 commits ahead of the remote master branch on GitHub.
Therefore, to push the changes to GitHub, run as follows:
sam (master) test-cdss-git-training-repo $ git push
Counting objects: 16, done.
Delta compression using up to 8 threads.
Compressing objects: 100% (12/12), done.
Writing objects: 100% (16/16), 1.89 KiB | 0 bytes/s, done.
Total 16 (delta 5), reused 0 (delta 0)
remote: Resolving deltas: 100% (5/5), done.
To https://github.com/smalers/test-cdss-git-training-repo.git
   a0302cd..f76d8f5  master -> master
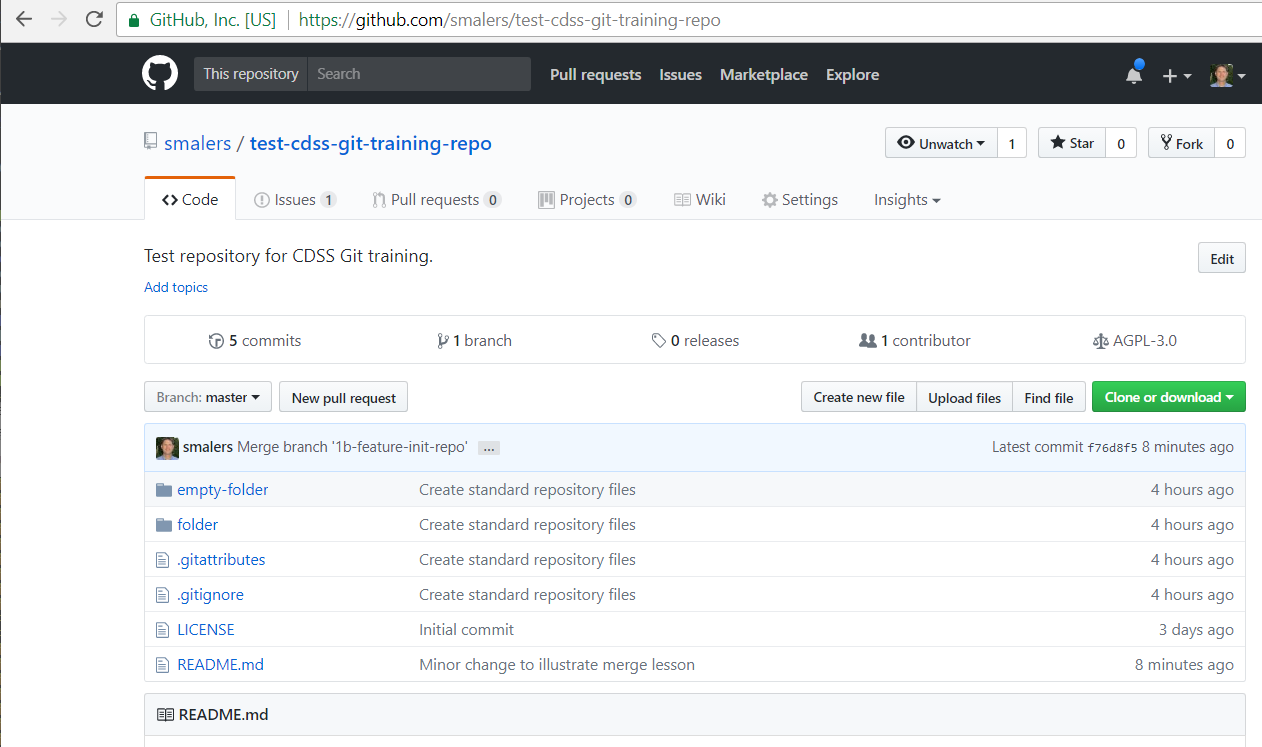
Because the files have been pushed to GitHub, it is now possible to view the files on GitHub, as shown in the following image:
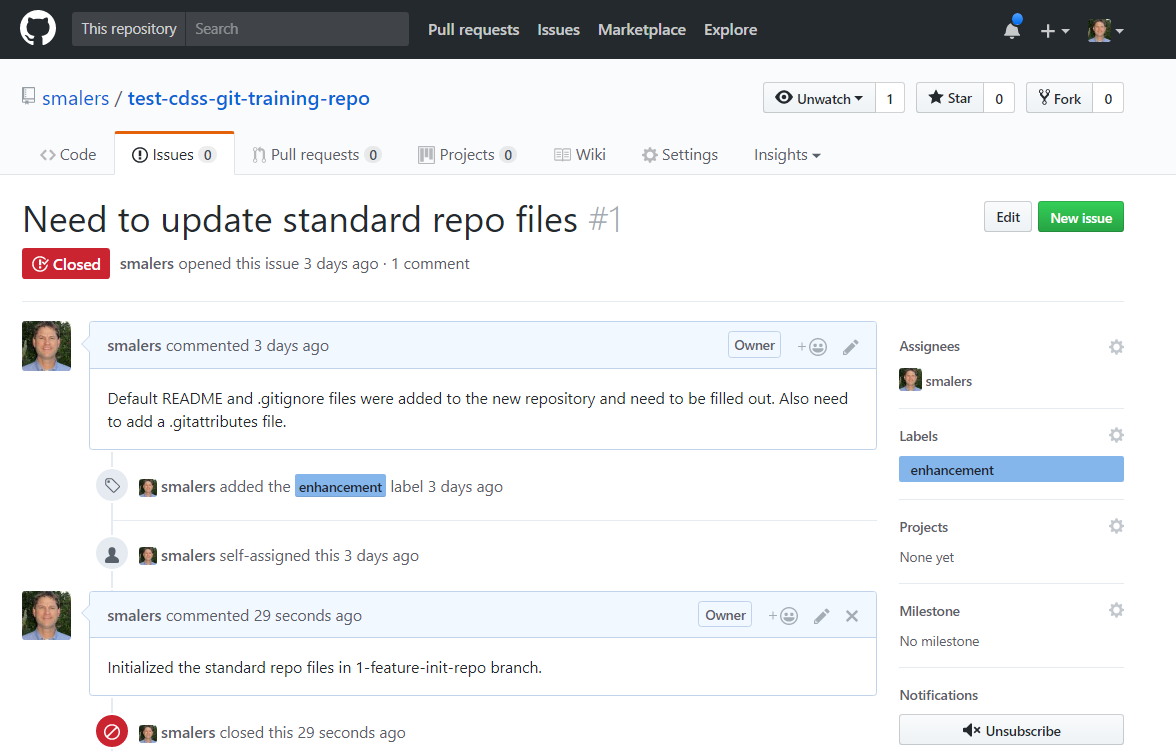
Because the issue is resolved, use the GitHub Issues tab for the repository to add a comment and mark the issue as resolved, similar to the following. It may be helpful to confirm with the original issue reporter that the issue is resolved before closing. It is also desirable to implement an automate test to confirm a bug fix or new feature.
Delete the Branch Using git branch
This step discards the temporary working branch. Since it has been committed, the branch is no longer be needed. The commit message and possibly a tag (described below) will allow a developer to check out a specific commit if necessary.
After the above actions, the local master branch is consistent with the remote GitHub master branch and there
are two local branches that were used for incremental work. These branches can be listed as shown below:
sam (master) test-cdss-git-training-repo $ git branch
  1-feature-init-repo
  1b-feature-init-repo
* master
The asterisk * indicates that master is the current branch, which is consistent with the Git Bash prompt.
Because the issue branches are no longer needed, they can be deleted. However, before deleting, try the following commands, which indicate whether a local branch has or has not been merged with the master (useful if a branch exists for some long-running enhancement or has been set aside for some reason):
sam (master) test-cdss-git-training-repo $ git branch --merged master
  1-feature-init-repo
  1b-feature-init-repo
* master

sam (master) test-cdss-git-training-repo $ git branch --no-merged master
We know that both feature branches were merged so it is safe to delete them.
Or, if it were appropriate to do a backup of the working files for the branch, a branch could be checked out
with git checkout 1-feature-init-repo, do the backup, and then run git checkout master.
To delete the branches that are no longer needed:
sam (master) test-cdss-git-training-repo $ git branch -d 1-feature-init-repo
Deleted branch 1-feature-init-repo (was fabfed9).

sam (master) test-cdss-git-training-repo $ git branch -d 1b-feature-init-repo
Deleted branch 1b-feature-init-repo (was c4a4eb5).

sam (master) test-cdss-git-training-repo $ git log --oneline --graph --decorate --all
*   f76d8f5 (HEAD -> master, origin/master, origin/HEAD) Merge branch '1b-feature-init-repo'
|\
| * c4a4eb5 Minor change to illustrate merge lesson
|/
* fabfed9 Updated README.md file to include more information about the repository.
* 50dadc6 Create standard repository files
* a0302cd Initial commit
Note that in the above the branch is still indicated in the history (even if deleted) because Git recognizes that there was a divergence and then a merge, based on the number of parent and child commits. However, the first "fast forward" merge simply played the changes onto the master and does not show the branch.
Create a Tag Using git tag
This step is used to mark a commit as a named version, such as at a major milestone.
Git branches can be used for long-running version histories such as master
and short histories such as a bug fix or feature branch.
In both cases, a branch typically represents work that occurs over a timespan.
A branch can continue to move forward with additional commits.
A "tag", on the other hand, represents the status and contents of the repository at a single point in time. Tags are most often used to indicate milestones or release versions. Tags are convenient because it is possible to checkout the repository working files corresponding to a tag, for example to build a version of software or to examine a document at a point in time. Tags have similarity to other commits. For more information, see: Git Pro Book - Tagging.
Tags can be created as lightweight or annotated. It is best to use annotated tags, as shown in the following example:
sam (master) test-cdss-git-training-repo $ git tag -a version1 -m 'Version 1 of product'

sam (master) test-cdss-git-training-repo $ git tag
version1

sam (master) test-cdss-git-training-repo $ git push origin --tags
Counting objects: 1, done.
Writing objects: 100% (1/1), 182 bytes | 0 bytes/s, done.
Total 1 (delta 0), reused 0 (delta 0)
To https://github.com/smalers/test-cdss-git-training-repo.git
 * [new tag]         version1 -> version1
The git tag command with annotation and commit message creates the tag for the current commit.
The git tag command without other parameters lists tags.
The git push command pushes the tags to the GitHub repository.
The tag is then listed on GitHub as shown in the following image.

Publish User Versions
Multiple additional steps may be needed to publish the work in a way that can be used by others.
The repository contains the source files for software, a dataset, a website, etc. The files should be organized in a way that allows the developers of the content to perform review, automated testing, etc. However, these files are most likely not directly usable by people or tools that want to use the final product. Consequently, additional packaging of products should be built into the repository. Examples of user versions for CDSS include:
- For documentation:
- Package and distribute the documentation with software (for software documentation) or data (for dataset documentation)
- Install the documentation on a public website
- See the Documentation Example
- For model datasets (StateMod, StateCU, etc.):
- Package and distribute input files so developers can create the model dataset files
- Run the dataset using a specific model software version, and package
- See the StateMod Dataset Example and distribute the full input and output
- For software:
- Package and distribute software installer that can be run to install the software.
- See the StateMod Code Example
These steps are specific to the repository and its contents. Examples of the full workflow for the above cases are provided in other lessons. Publishing user-focused versions of repository contents should use scripts to automate work so that packaging can be efficient, documented, and human errors can be minimized.
Next Steps
The next steps are to learn more about GitHub features, to apply what you have learned to code and dataset repositories, and to increase your knowledge with more advanced topics such as dealing with merge conflicts. From this point forward the lessons can be taken non-sequentially and developers are expected to expand their knowledge based on first-hand experience with Git and GitHub.