2.3 - File Menu
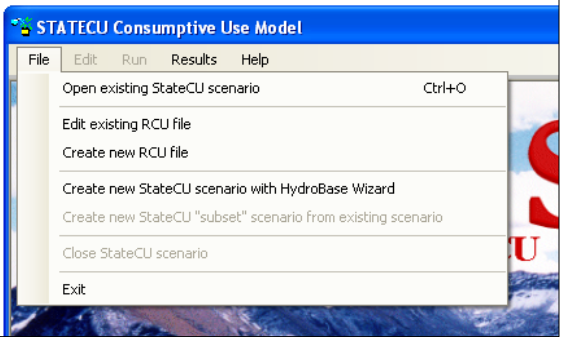
Commands under the File menu shown in Figure 2 below allow existing StateCU datasets to be loaded and the GUI to be exited.
Figure 2 - File Menu Commands (see also the full-size image)
2.3.1 - Open Existing StateCU Scenario
The Open existing StateCU scenario command allows the selection of a StateCU response (*.rcu) file, which results in a dataset being read. An Open File window will appear that allows the user to choose a response file located on any available disk drive and directory. Selecting a response file triggers the GUI to read the StateCU input files associated with that dataset.
Several base datasets are available on the CDSS website for use with the StateCU GUI corresponding to the CDSS basin modeling efforts. Base datasets with filled climate and diversion records are provided for each CDSS western slope basins (Gunnison, San Juan/Dolores, Upper Colorado, White and Yampa), the Rio Grande basin and the South Platte basin. Base climate datasets with filled climate data are available for the Arkansas and Republican basins. A statewide climate dataset is available without filling of missing climate data.
A flag in the input control file specifies whether the CU Location is associated with a climate station or structure. A Climate Station Scenario involves a limited number of input data files, as reflected by a simplified set of input windows displayed by the graphical user interface. The water supply limited crop consumptive use and other more complex levels of analyses are only available under a Structure Scenario.
2.3.2 - Open Existing StateCU Scenario
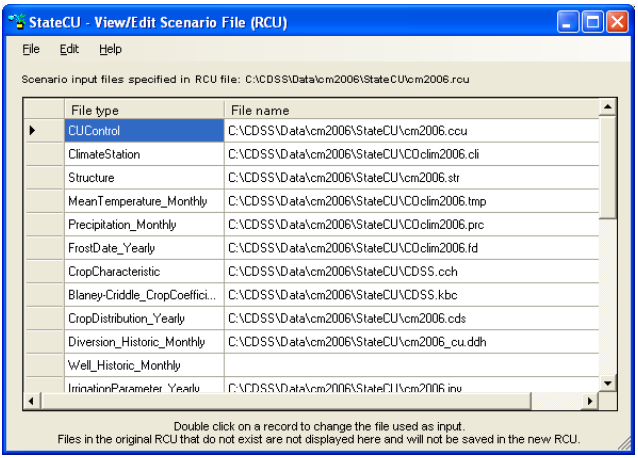
The Edit existing RCU file command allows the user to edit individual input files listed in the response file of a scenario. When the Edit existing RCU file is selected from the File menu, an Open File window is activated that allows the user to choose a response file located on any available disk drive or directory. Selecting a response file activates the View/Edit Scenario File (RCU) window (Figure 3). The user can then double click on a file name, prompting another Open File window, in which the user can choose individual files located on any available disk drive or directory. Note that input files listed in the original response file that do not exist are not listed in the View/Edit Scenario File (RCU) window and will not be saved in the new response file. The Copy option under the Edit menu allows the user to copy the input file names and paste the list in an external application, such as a text editor or spreadsheet. Utilize the Edit…Select All option or individually select or deselect input file names to copy by holding down the CTRL key while selecting file names with the LEFT mouse button.
Figure 3 - View/Edit Scenario File (RCU) (see also the full-size image)
To save the changed input files, select Save from the View/Edit Scenario File (RCU)…File menu. This command saves changes over the active response file. The Save As… command allows the response file to be saved in a different location or to a different name. Select Input File Info from the Help menu to view the path and filename of the active input file.
2.3.3 - Create New RCU File
The Create new RCU file command allows the user to create a new response file by individually selecting input files to be listed in the new response file. When the Create new RCU file is selected from the File menu, a blank View/Edit Scenario File (RCU) window is activated. Double click on a file name box to activate an Open File window, in which the user can choose individual input files located on any available disk drive or directory. Enter in all of the required input files to create the new response file. Different files are required depending on whether a Climate Station Scenario or a Structure Scenario is created. See Section 7.15 for more information on the required files for a Climate Station Scenario and Section 4 for more information on the required input files for a Structure Scenario.
The Copy option under the Edit menu allows the user to copy the input file names and paste the list in an external application, such as a text editor or spreadsheet. Utilize the Edit…Select All option or individually select or deselect input file names to copy by holding down the CTRL key while selecting file names with the LEFT mouse button. To save new response file, select Save or Save As… from the File menu. Both commands will prompt the user to name the new response file and provide the directory location to save the response file to. Once the new response file is saved, choose the Open existing StateCU Scenario from the File menu to load the new scenario. Select Input File Info from the Help menu to view the path and filename of the active input file.
2.3.4 - Create New StateCU Scenario Using HydroBase Wizard
The Create new StateCU scenario using HydroBase Wizard command allows the user to build a new StateCU scenario using the HydroBase Wizard. The HydroBase Wizard is an interactive tool that guides the user step-by-step through the development of a new scenario and pulls required input data directly from HydroBase through an internet connection. The HydroBase Wizard can be used to create a new Climate Station Scenario or a Structure Scenario. See Section 2.4 for more details on the HydroBase Wizard.
2.3.5 - Create New StateCU 'Subset' Scenario From Existing Scenario
The Create new StateCU ‘subset’ scenario from existing scenario command allows the user to create a new StateCU scenario using a subset of the structures from a scenario currently loaded in the StateCU GUI. This option is not available until a scenario has been opened and loaded in the GUI. A Climate Station Scenario can only be created from a subset of an existing Climate Station Scenario and Structure Scenario can only be created from a subset of an existing Structure Scenario.
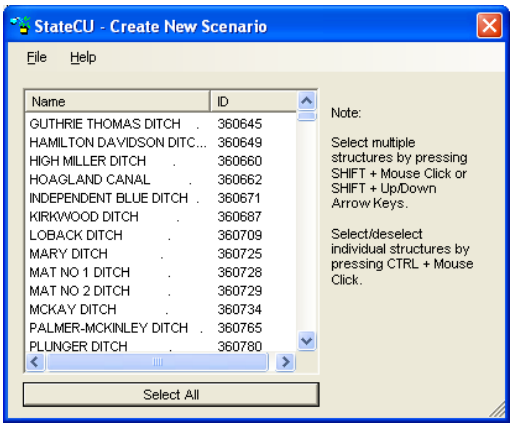
When this command is selected from the File menu, the Create New Scenario window (Figure 4) is activated, in which the user can select the structures or climate stations to be included in the new scenario. Multiple structures can be selected for inclusion in the new subset scenario by holding down the SHIFT key while selecting structures using the LEFT mouse button or the Up and Down arrow keys. The Select All button can be used to select all the structures in the currently loaded scenario. Individual structures can then be selected or deselected by holding down the CTRL key while selecting structures using the LEFT mouse button.
To save the desired structures in the new subset scenario, select Save from the Create New Scenario…File menu. This command saves changes over the active response file. The Save As… command allows the response file to be saved in a different location or to a different name. Select Input File Info from the Help menu to view the path and filename of the active input file.
Figure 4 - Create New Scenario (see also the full-size image)
2.3.6 - Close StateCU Scenario
The Close StateCU Scenario command closes the StateCU scenario currently loaded in the StateCU GUI without closing the StateCU GUI application. When the Close StateCU Scenario command is selected from the File menu, the GUI will close the scenario and display the CDSS splashscreen. The user can then choose to open another scenario or exit out of the GUI using options in the File menu.
2.3.7 - Exit
The Exit command closes the StateCU GUI. When the Exit command is selected from the File menu, the StateCU GUI gives the user an opportunity to choose not to exit.